
If you’ve ever changed your blog’s permalink structure or restructured your content, you’ve probably noticed a frustrating issue: old URLs no longer work. Visitors might see a 404 error, and worse — any links already indexed by Google or shared on social media will break.
The good news? There’s a simple fix. And you don’t need to know a line of code.
In this guide, we’ll walk through how to:
- Set up redirects in WordPress
- Use the Redirection plugin effectively
- Prevent broken links from hurting your SEO
- Track and manage all your redirects in one place
Let’s dive in.
What Is a Redirect?
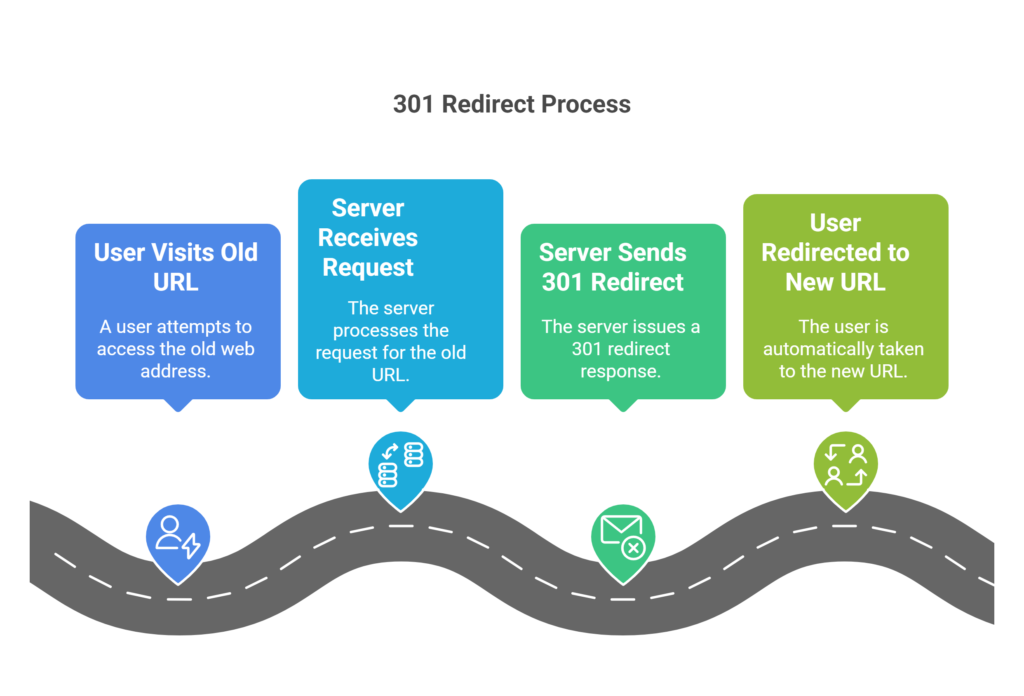
A redirect is a way to send both users and search engines from one URL to another. The most common type is a 301 redirect, which tells search engines the page has permanently moved to a new location.
Example:
yourdomain.com/old-post-url/ → yourdomain.com/blogs/old-post-url/
When someone visits the old URL, they’ll automatically be taken to the new one — seamlessly.
Why Use Redirects?
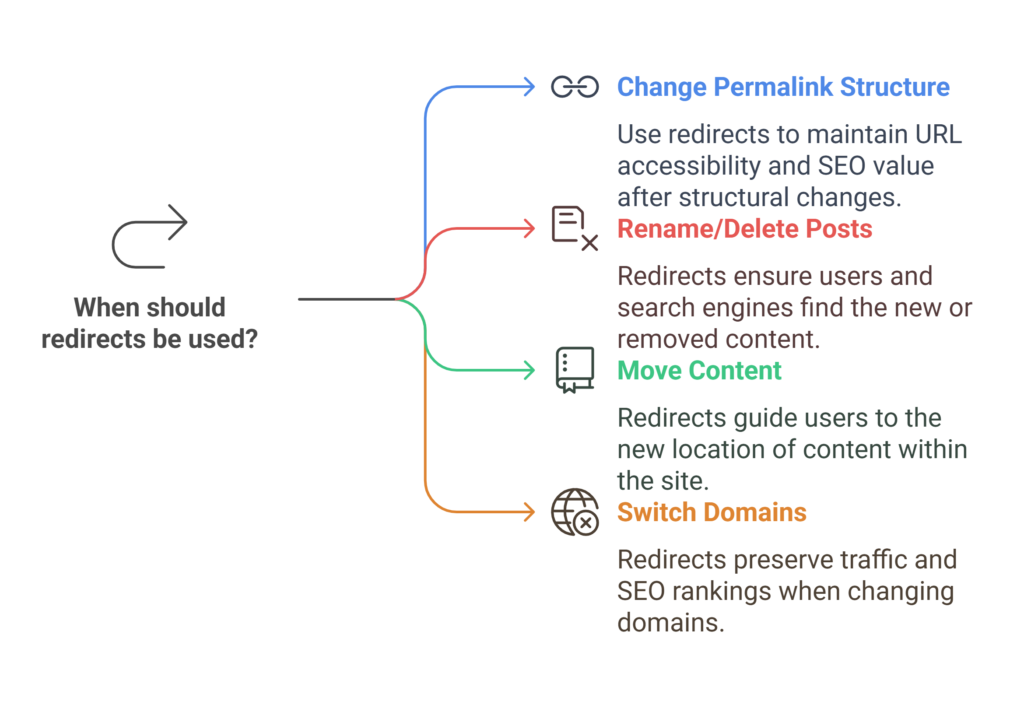
Redirects are crucial when:
- You change your permalink structure (e.g., add /blog/ to all post URLs)
- You rename or delete blog posts or pages
- You move content to a different section of your site
- You switch domains or subdomains
Without redirects, visitors and search engines will land on dead pages, hurting user experience and SEO.
Step-by-Step: Redirect URLs Using the Redirection Plugin
One of the easiest ways to manage redirects in WordPress is with a plugin called Redirection — it’s free, powerful, and beginner-friendly.
Step 1: Install the Redirection Plugin
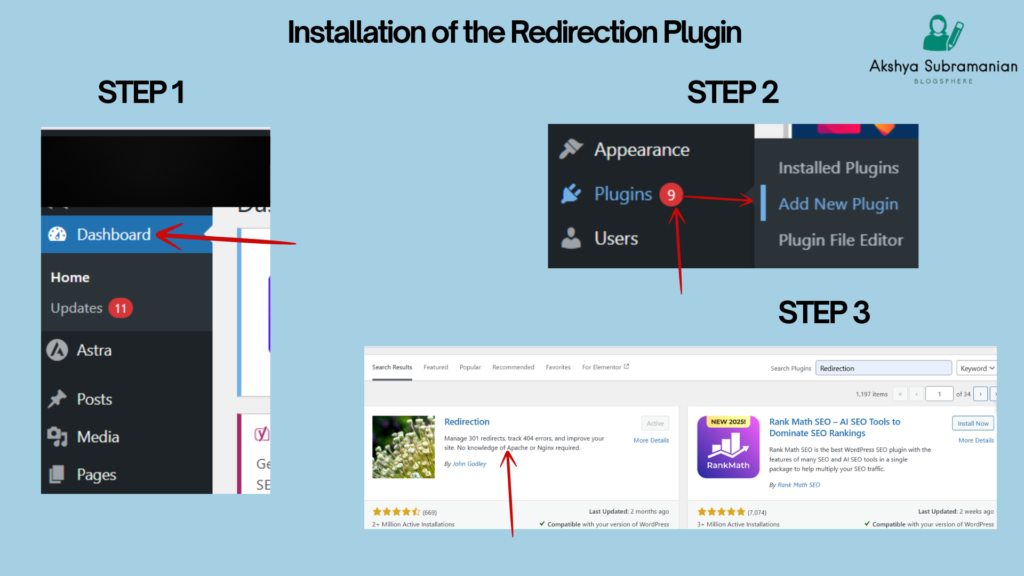
- Go to your WordPress dashboard.
- Navigate to Plugins > Add New
- Search for “Redirection”
- Look for the one developed by John Godley
- Click Install Now → then Activate
This will add a new menu under Tools > Redirection.
Step 2: Set Up the Plugin (First-Time Only)
The first time you open it:
- You’ll see a setup wizard.
- Click Continue Setup a few times.
- Allow it to monitor permalinks and keep logs (recommended).
- Complete setup.
Once done, you’ll land on the main Redirection dashboard.
Step 3: Add a New Redirect

To create a redirect:
- Scroll down to the “Add new redirection” section.
In Source URL, enter the old URL path (without the domain).
Example:
/old-post-url/
In Target URL, enter the new path you want it to go to.
Example:
/blog/old-post-url/
- Leave the Group as “Redirections” and click Add Redirect.
Done! Now anytime someone visits the old URL, they’ll be sent to the new one automatically.
What “Relative URL” Means
You don’t need to type the full domain in the fields. Just use the part after .com, like:
- /my-old-article/
- /blog/my-new-article/
This ensures it works across your domain without error.
What Else Can Redirection Do?
This plugin is more than just a redirect tool. Here are some of the extra features that make it powerful:
1. Track 404 Errors
Redirection can monitor 404 pages (broken links) automatically. This helps you:
- Spot broken or outdated internal links
- Redirect users before they bounce
- Fix SEO issues proactively
You’ll find this under the “404s” tab.
2. Bulk Redirects
If you have lots of posts to redirect (like after changing URL structure), you can:
- Manually enter each
- Or import a list via CSV under the Import/Export tab
Format for import:
Source URL,Target URL
/old-url-1/,/new-url-1/
/old-url-2/,/new-url-2/
3. Track Hits
For every redirect, you can see how many times it’s been used. This is helpful to:
- See which posts are still getting traffic
- Identify outdated URLs that are still popular
The Hits column tells you how often each redirect is triggered.
4. Conditional Redirects
You can set up advanced rules, like:
- Redirect based on user login status
- Redirect only for mobile users
- Redirect with query parameters
This is more advanced, but useful for custom user flows.
SEO-Safe and Beginner Friendly
Because Redirection uses 301 redirects by default, it passes link juice (SEO value) from old URLs to the new ones — meaning you won’t lose your rankings on Google. It’s also:
- Lightweight and secure
- Regularly updated
- Does not require coding or editing .htaccess manually
Final Thoughts
If you’re restructuring your blog or switching up your permalink format, setting up redirects is not optional — it’s essential. The Redirection plugin makes it simple and safe for beginners to manage this without breaking a sweat (or their SEO).
So before you lose traffic to broken links, set your redirects right and keep your blog running smoothly.